


QoS-VPP Case
This guide provides a step-by-step tutorial for configuring the Quality of Service (QoS) capabilities of the Asterfusion ET2500 Open Intelligent Gateway running AsterNOS-VPP.
What This Guide Will Accomplish
Section titled “What This Guide Will Accomplish”By following this guide, you will learn how to implement progressively advanced traffic control strategies, moving from granular flow control to interface-level management, and finally to complex service level agreements (SLA). The scenarios covered are:
- Phase 1: Bi-directional Flow-Based Policing (Smart Flow Control): Configuring the gateway to intelligently limit high-bandwidth UDP traffic (e.g., video/P2P) while allowing TCP traffic (e.g., office work) to pass at full speed.
- Phase 2: Bi-directional Port-Based Rate Limiting (Hard Limiting): Applying a strict bandwidth limit on a specific physical interface, regardless of traffic type, suitable for tenant management.
- Phase 3: Elastic Bandwidth Management (tr-TCM): Implementing a “Guaranteed + Burstable” bandwidth service using Two-Rate Three-Color Marker (tr-TCM) technology.
Preparation: Building the Basic Network
Section titled “Preparation: Building the Basic Network”Before applying QoS policies, we must ensure basic connectivity and NAT are working.
Topology & Planning
Section titled “Topology & Planning”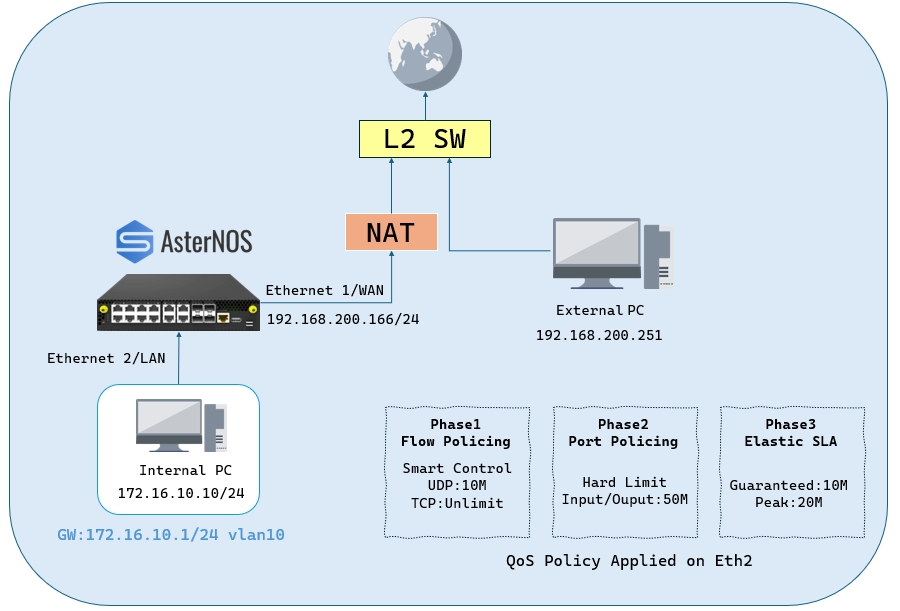
- Lab Components:
| Device Type / Operating System | Role in Topology | Key Function in This Guide |
|---|---|---|
| ET2500 / AsterNOS | QoS Gateway | Device Under Test (DUT) for QoS configuration. |
| Physical PC / Windows | Internal Client | Client PC for generating traffic and testing speed. |
| Physical PC / Linux or Windows | Traffic Server | Server in the WAN zone (External PC) running iperf3. |
- Target Configuration Plan:
| Device / Logical Interface | IP Address / Subnet | Default Gateway | Notes / Connection Point |
|---|---|---|---|
| AsterNOS VM (WAN) | 192.168.200.166/24 | 192.168.200.1 | Connects via Ethernet1 to Upstream Switch |
| AsterNOS VM (LAN) | 172.16.10.1/24 | - | Gateway for Internal Client (Ethernet2 in VLAN 10) |
| Internal Client PC | 172.16.10.10/24 | 172.16.10.1 | Connects to AsterNOS Ethernet2 |
| Traffic Server (External) | 192.168.200.251/24 | 192.168.200.1 | Connects to Upstream Switch |
Configuration steps
Section titled “Configuration steps”Step 1: Configure Interfaces, Routing and NAT
sonic# configure terminalsonic(config)# interface ethernet 1sonic(config-if-1)# ip address 192.168.200.166/24sonic(config-if-1)# nat-zone 1sonic(config-if-1)# exit
sonic(config)# vlan 10sonic(config-vlan-10)# exitsonic(config)# interface vlan 10sonic(config-vlanif-10)# ip address 172.16.10.1/24sonic(config-vlanif-10)# exitsonic(config)# interface ethernet 2sonic(config-if-2)# switchport access vlan 10sonic(config-if-2)# exit
sonic(config)# ip route 0.0.0.0/0 192.168.200.1
sonic(config)# nat enablesonic(config)# nat pool global_pool 192.168.200.166sonic(config)# nat binding global_bind global_pool
**Verification:** Ensure the Internal Client can ping the Traffic Server (`192.168.200.251`).
***
Phase 1: Bi-directional Flow-Based Policing (Smart Flow Control)
**Goal:** Limit **UDP traffic** (e.g., Video/P2P) to **10 Mbps** in both Upload and Download directions, while allowing **TCP traffic** (e.g., Office work) to utilize the full available bandwidth without restriction.
## Configuration steps
- **Step 1: Define Traffic Behavior**  Create a behavior that defines the rate limit (CAR) for UDP traffic.  - **CIR:** 1250 KBps.  - **CBS:** 100000 Bytes (Burst buffer).
BlockQuote{indent=“2”} sonic(config)# traffic behavior FLOW_POLICER_10M sonic(config-traffic-behavior-FLOW_POLICER_10M)# car sr-tcm cir 1250 cbs 100000 sonic(config-traffic-behavior-FLOW_POLICER_10M)# exit
- Step 2: Define Flow Classification (ACLs) Create two ACLs (Ingress and Egress) to identify UDP traffic. TCP and other traffic will match the default permit rule (or you can explicitly add a permit rule). 1. Configure Ingress ACL (Upload Control)
sonic(config)# access-list L3 FLOW_CONTROL ingress sonic(config-l3-acl-FLOW_CONTROL)# rule 10 ip-protocol 17 traffic-behavior FLOW_POLICER_10M sonic(config-l3-acl-FLOW_CONTROL)# exit
- 2. Configure Egress ACL (Download Control)
sonic(config)# access-list L3 FLOW_CONTROL_OUT egress sonic(config-l3-acl-FLOW_CONTROL_OUT)# rule 10 ip-protocol 17 traffic-behavior FLOW_POLICER_10M sonic(config-l3-acl-FLOW_CONTROL_OUT)# exit
- 3. Verify ACL rule
sonic(config)# do show acl rule

- Step 3: Apply Policies to Interface
Bind both ACLs to the LAN interface (
Ethernet2) to enforce bi-directional control.
sonic(config)# interface ethernet 2 sonic(config-if-2)# acl FLOW_CONTROL sonic(config-if-2)# acl FLOW_CONTROL_OUT sonic(config-if-2)# exit
Verification
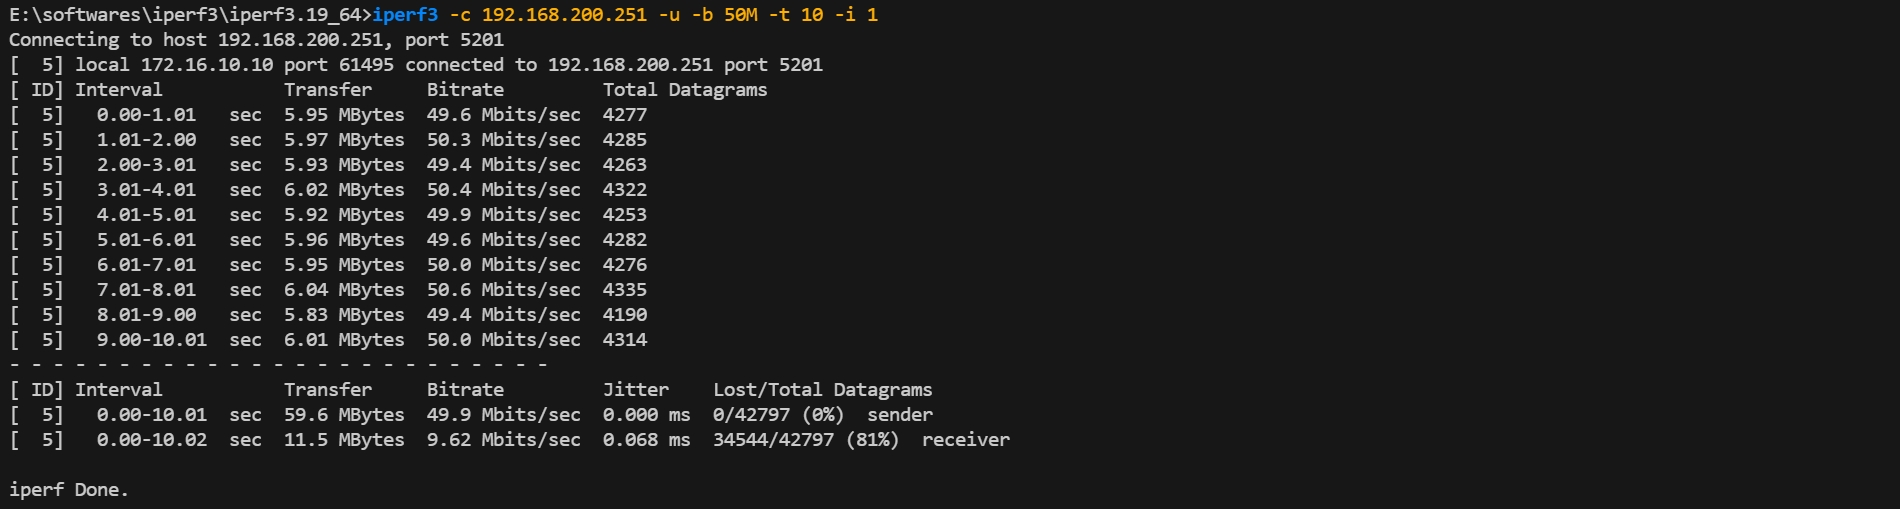
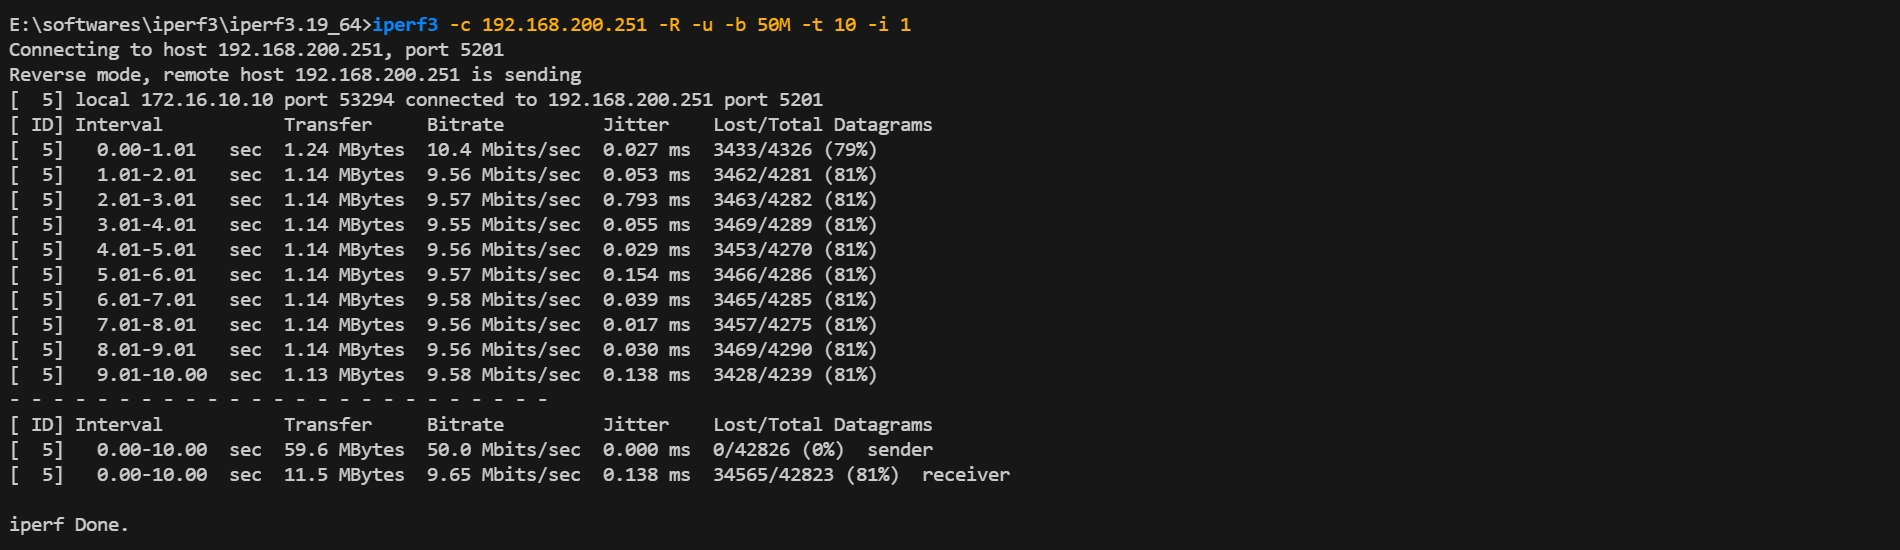
Section titled “Verification”- UDP Test (Should be Limited):
Execute:
iperf3 -c 192.168.200.251 -u -b 50M -t 10 -i 1(Add-Rfor download test) Expected Result: The bandwidth is strictly limited to ~10 Mbps with high packet loss in both directions.
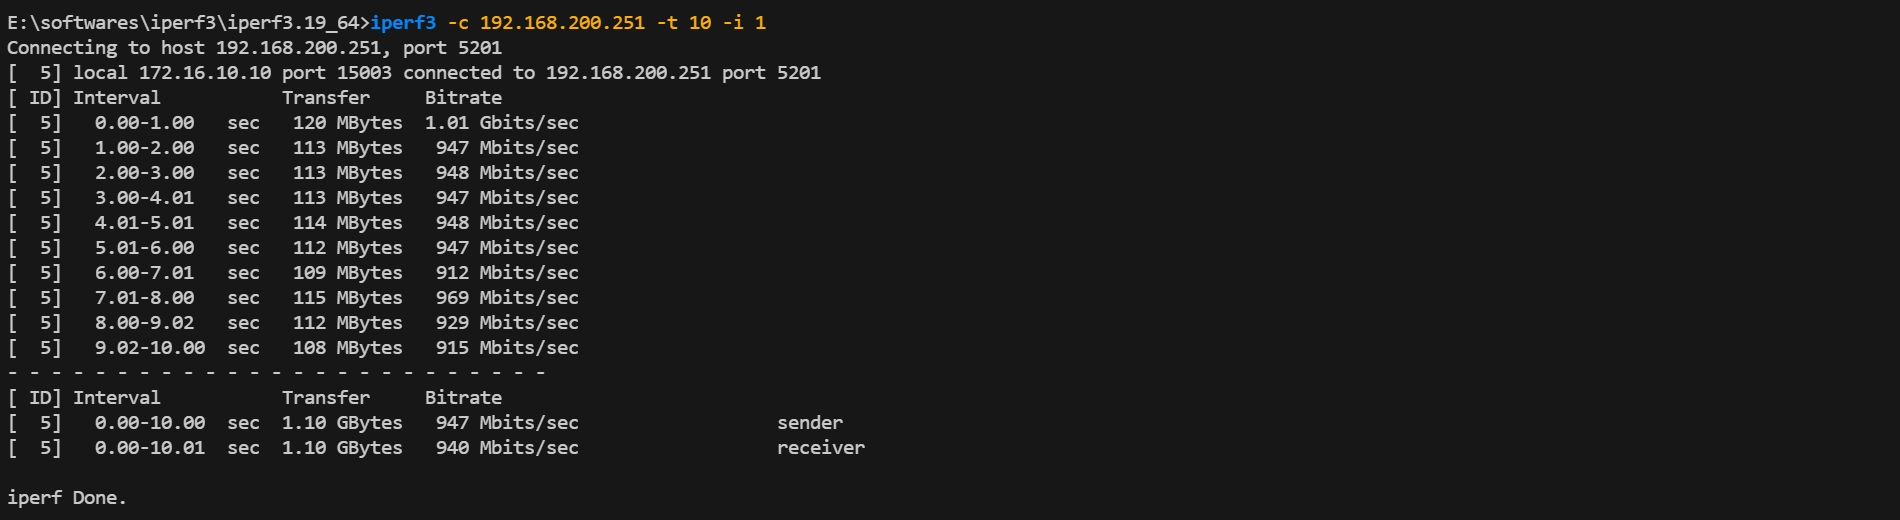
- TCP Test (Should be Unlimited):
Execute:
iperf3 -c 192.168.200.251 -t 10 -i 1(Add-Rfor download test) Expected Result: The bandwidth reaches ~950 Mbps (or line rate), proving that normal office traffic is unaffected.
Phase 2: Port-Based Bi-directional Rate Limiting
Section titled “Phase 2: Port-Based Bi-directional Rate Limiting”Goal: Limit the total bandwidth of Ethernet2 to 50Mbps in both directions (Upload/Ingress and Download/Egress). This effectively simulates a 50Mbps dedicated line for a tenant.
Configuration steps
Section titled “Configuration steps”- Step 1: Clean Up Previous Configuration
sonic(config)# interface ethernet 2 sonic(config-if-2)# no acl FLOW_CONTROL sonic(config-if-2)# exit
- Step 2: Define Port Limit Behavior
- CIR: 6250 KBps.
sonic(config)# traffic behavior PORT_POLICER_50M sonic(config-traffic-behavior-PORT_POLICER_50M)# car sr-tcm cir 6250 cbs 100000 sonic(config-traffic-behavior-PORT_POLICER_50M)# exit
- Step 3: Bind to Interface (Both Directions) Bind the behavior to both Ingress (default) and Egress directions to enforce a symmetric speed limit.
sonic(config)# interface ethernet 2 sonic(config-if-2)# traffic-behavior bind PORT_POLICER_50M sonic(config-if-2)# traffic-behavior bind egress PORT_POLICER_50M sonic(config-if-2)# exit
Verification
Section titled “Verification”- Upload Test (Ingress Limit):
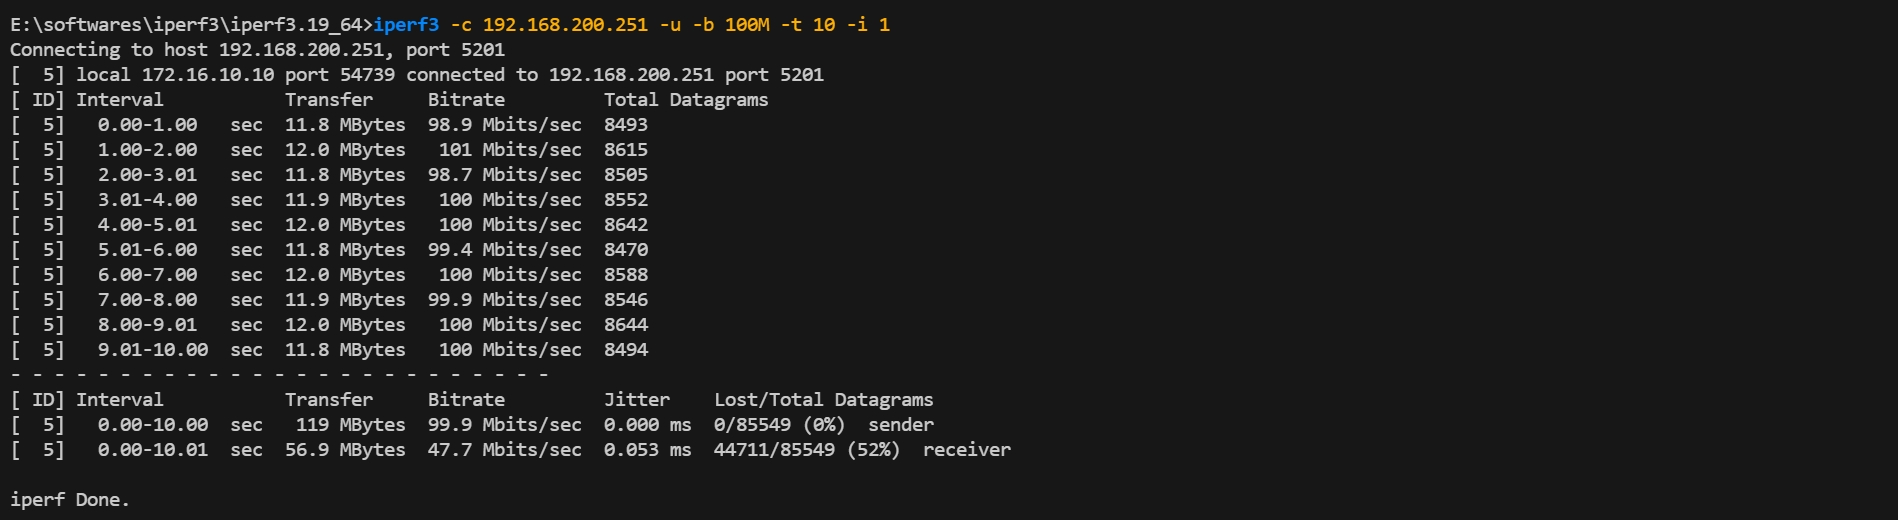
Execute:
iperf3 -c 192.168.200.251 -u -b 100M -t 10 -i 1Expected Result: Bandwidth capped at ~50Mbps.
- Download Test (Egress Limit):
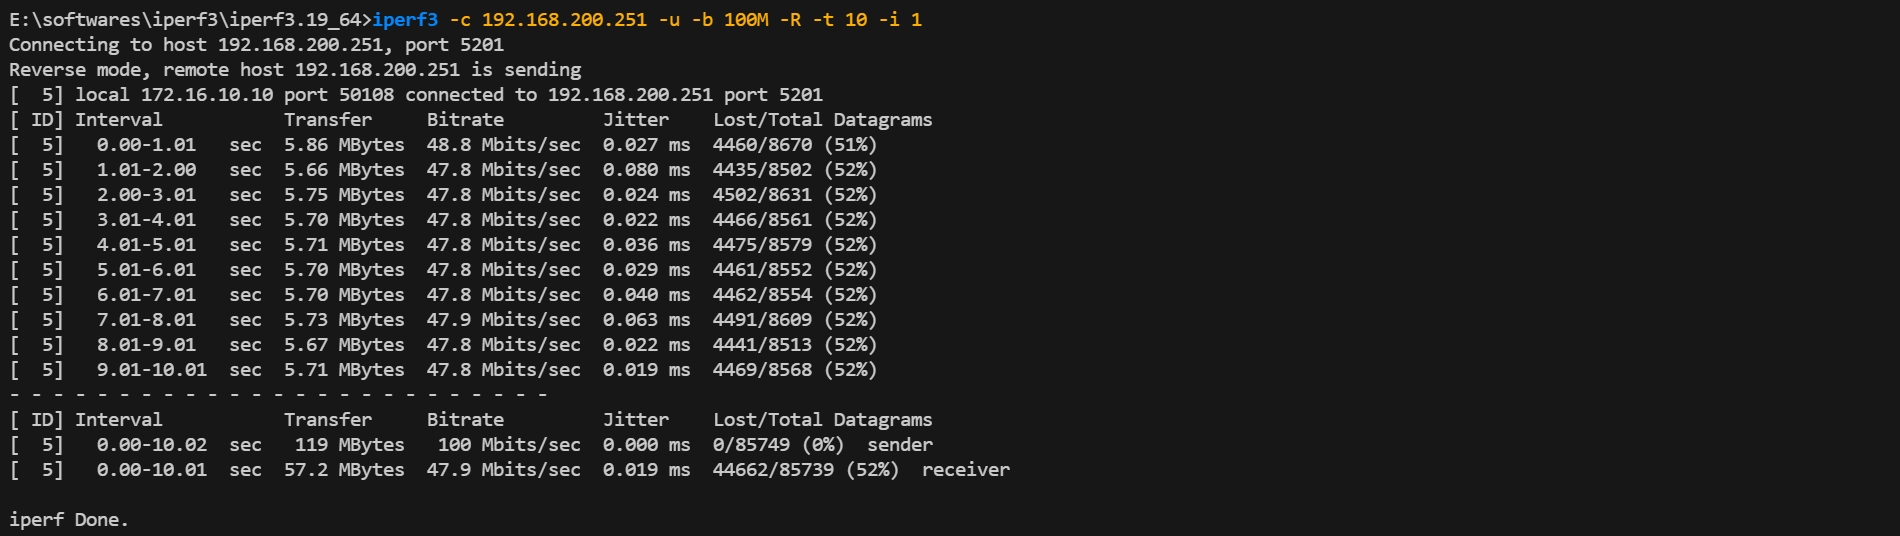
Execute:
iperf3 -c 192.168.200.251 -u -b 100M -R -t 10 -i 1Expected Result: Bandwidth is also capped at ~50Mbps.
Phase 3: Elastic Bandwidth Management (tr-TCM)
Section titled “Phase 3: Elastic Bandwidth Management (tr-TCM)”Goal: Implement a flexible SLA policy where the user is guaranteed 10Mbps (CIR) but allowed to burst up to 20Mbps (PIR). Traffic exceeding 20Mbps is dropped.
Configuration steps
Section titled “Configuration steps”- Step 1: Clean Up Previous Configuration
sonic(config)# interface ethernet 2 sonic(config-if-2)# no traffic-behavior bind sonic(config-if-2)# exit
- Step 2: Define Two-Rate Three-Color Marker (tr-TCM)
- CIR (Guaranteed): 1250 KBps.
- PIR (Peak): 2500 KBps.
- PBS: 200000 Bytes (Peak buffer, must be > CBS).
sonic(config)# traffic behavior SLA_ELASTIC_20M sonic(config-traffic-behavior-SLA_ELASTIC_20M)# car tr-tcm cir 1250 cbs 100000 pir 2500 pbs 200000 sonic(config-traffic-behavior-SLA_ELASTIC_20M)# exit
- Step 3: Bind to Interface
sonic(config)# interface ethernet 2 sonic(config-if-2)# traffic-behavior bind SLA_ELASTIC_20M sonic(config-if-2)# exit
Verification
Section titled “Verification”- Test “Yellow” Zone (Elastic Burst):
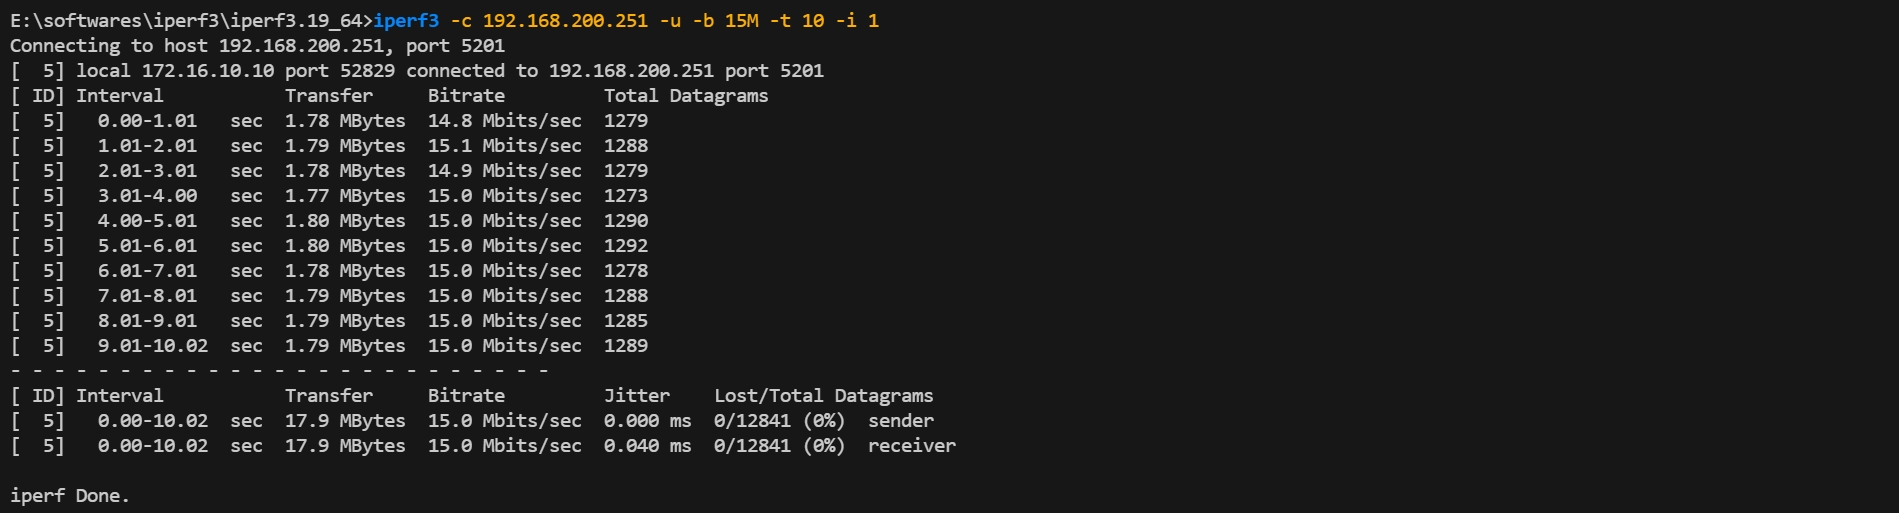
Execute:
iperf3 -c 192.168.200.251 -u -b 15M -t 10 -i 1Expected Result: Bandwidth reaches 15Mbps (exceeding CIR but within PIR), showing allowed burst.
- Test “Red” Zone (Peak Cap):
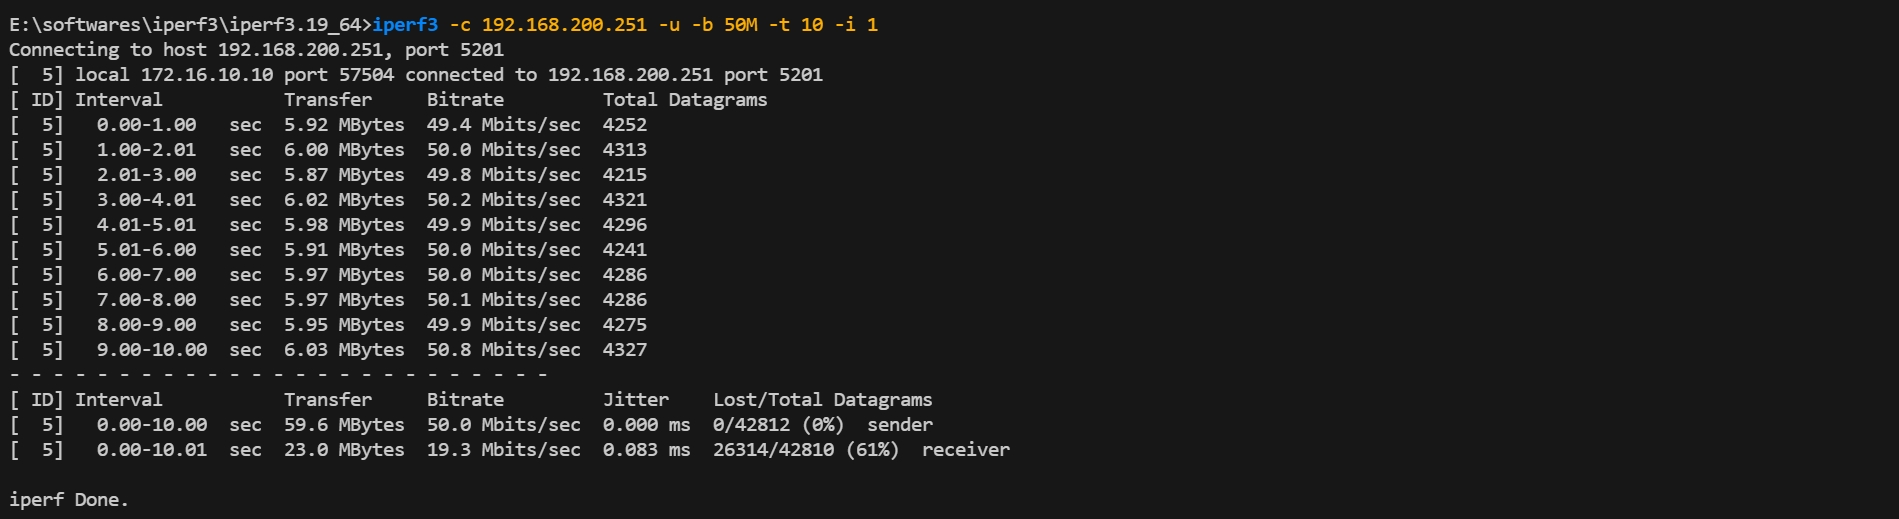
Execute:
iperf3 -c 192.168.200.251 -u -b 50M -t 10 -i 1Expected Result: Bandwidth is strictly capped at ~20Mbps (PIR limit).
Summary of QoS Policies
Section titled “Summary of QoS Policies”After configuring the scenarios above, you can verify all created traffic behaviors in the system database. This confirms that the rate-limiting parameters (CIR, PIR, CBS, PBS) are correctly defined.
- Command:
sonic# show traffic-behavior rule
- Output Verification:
Ensure that the modes (
SR_TCMvsTR_TCM) and rate values match your design requirements.

Conclusion
Section titled “Conclusion”This guide has verified the comprehensive QoS capabilities of AsterNOS-VPP, enabling granular traffic management from basic port limits to complex flow-based and elastic bandwidth strategies.