


Nginx-VPP Case
此内容尚不支持你的语言。
This guide provides step-by-step instructions for deploying Nginx services on the Asterfusion Open Intelligent Gateway running AsterNOS-VPP. Leveraging Asterfusion’s unique LDP (LD_PRELOAD) architecture, AsterNOS achieves 100% compatibility with native Nginx configurations while delivering extreme concurrency performance through the VPP user-space data plane and hardware-accelerated crypto offloading.
What This Guide Will Accomplish
Section titled “What This Guide Will Accomplish”- Scenario 1: Native Static Web Server – Utilizing the gateway’s local storage (NVMe/eMMC) to provide high-performance file hosting services.
- Scenario 2: High-Performance L7 Reverse Proxy – Acting as an application-aware intermediary to forward traffic to backend server pools.
- Scenario 3: HTTPS & SSL Termination – Terminating SSL/TLS securely at the gateway edge to simplify centralized certificate management and relieve backend computational workloads.
- Scenario 4: Upstream Load Balancing – Distributing incoming traffic across multiple real backend nodes for high availability.
Network Planning & Global Configuration
Section titled “Network Planning & Global Configuration”Before deploying specific business scenarios, the underlying network and global Nginx parameters must be initialized.
****Network Topology Plan
Section titled “****Network Topology Plan”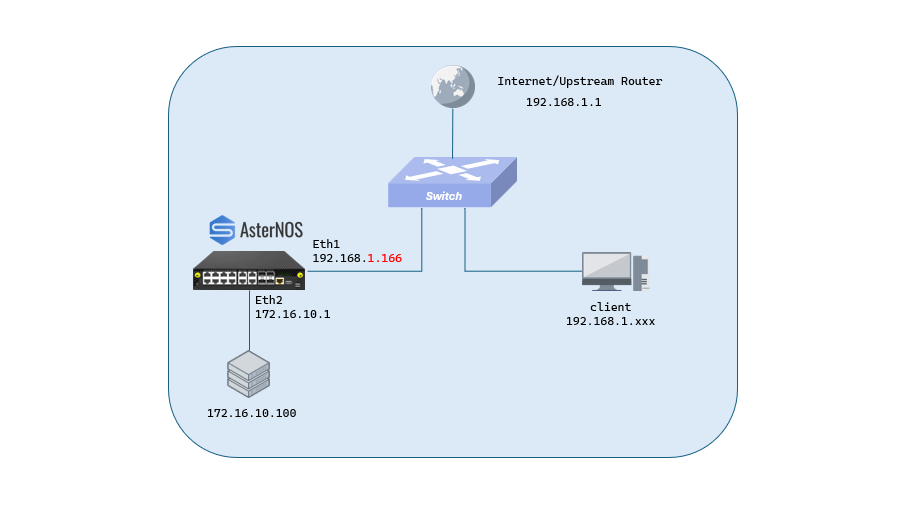
| Device / Interface | IP Address / Mask | Role Description |
|---|---|---|
| AsterNOS (Eth1) | 192.168.1.166/24 | WAN Port (Receives client requests) |
| AsterNOS (Eth2) | 172.16.10.1/24 | LAN Port (Connects to backend servers) |
| Backend Server | 172.16.10.100/24 | Business server hosting actual content |
Global Nginx Service Initialization
Section titled “Global Nginx Service Initialization”Enter the SONiC CLI to start the Nginx process and isolate CPU cores to ensure maximum data plane performance.
sonic# configure terminal
1. Start the Nginx core process
Section titled “1. Start the Nginx core process”sonic(config)# nginx start
2. Configure performance parameters (based on standard test specifications)
Section titled “2. Configure performance parameters (based on standard test specifications)”sonic(config)# nginx worker_connections 1500 sonic(config)# nginx keepalive_timeout 80
3. Isolate CPU cores: Allocate 2 cores to Nginx, keep VPP in auto-adaptation mode
Section titled “3. Isolate CPU cores: Allocate 2 cores to Nginx, keep VPP in auto-adaptation mode”sonic(config)# cpu_core nginx_num 2 vpp_num auto
4. Apply global settings and save
Section titled “4. Apply global settings and save”sonic(config)# nginx reload sonic(config)# exit sonic# write
Scenario 1: Native Static Web Server
This scenario demonstrates how AsterNOS serves local files through the VPP-LDP path directly to external clients.
P****repare Persistent Files
Section titled “P****repare Persistent Files”
note Note:
Since AsterNOS Nginx runs within a Docker container, only directories under /etc/sonic/ are persistently mounted into the container’s file system. Files placed elsewhere may be inaccessible to Nginx.
## Enter the Linux bash terminal of the deviceadmin@sonic:~$ sudo mkdir -p /etc/sonic/nginx_mmcadmin@sonic:~$ sudo bash -c 'echo "<h1>Success! AsterNOS Static Web Server is ALIVE!</h1>" > /etc/sonic/nginx_mmc/index.html'Configure and Deploy Static Web
Section titled “Configure and Deploy Static Web”Create the static_web.conf file on the host.
## content of /home/admin/static_web.confserver {    listen 8081;   # Use a dedicated port to avoid management web conflicts    server_name AsterNOS; # Catch-all wildcard for testing
    location / {        root /etc/sonic/nginx_mmc;  # Points to the container-visible mount point        index index.html;    }}
Apply the configuration using AsterNOS specific commands: ::: BlockQuote sonic(config)# nginx update server /home/admin/static_web.conf sonic(config)# nginx reload
Verif****y the Service
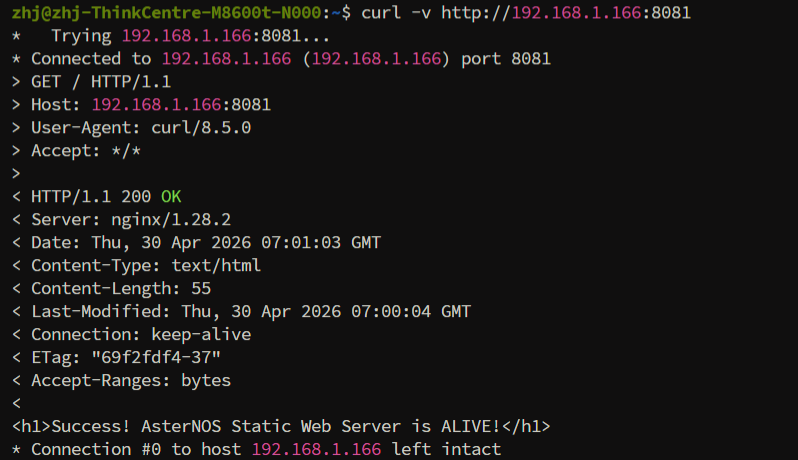
Section titled “Verif****y the Service”- Client Test: Execute a request from an external client:
curl -v http://192.168.1.166:8081 - Expected Result: The terminal should display the “Success! AsterNOS Static Web Server is ALIVE!” text with an
HTTP/1.1 200 OKstatus.
Scenario 2: High-Performance L7 Reverse Proxy
Section titled “Scenario 2: High-Performance L7 Reverse Proxy”Reverse Proxy is the most common gateway deployment. AsterNOS intercepts external traffic and transparently forwards it to the internal backend (172.16.10.100).
BlockQuote sonic(config)# nginx update server /home/admin/proxy.conf sonic(config)# nginx reload
Verify**** the Service
Section titled “Verify**** the Service”- Start Backend Service: Run
sudo python3 -m http.server 80on backend server(172.16.10.100). - Client Test: Run
curl -v http://192.168.1.166:8080. - **Backend Log Check: **Return to the backend server’s terminal. You should see the access log generated by the Python HTTP server.
172.16.10.1 - - "GET / HTTP/1.1" 200 -.

Scenario 3: HTTPS & Certificate Management (SSL Termination)
Section titled “Scenario 3: HTTPS & Certificate Management (SSL Termination)”In a typical enterprise environment, backend application servers should not be burdened with managing certificates across dozens of internal nodes.
AsterNOS serves as a unified secure boundary, terminating HTTPS traffic at the edge (SSL Termination) and proxying plain HTTP to the backend. It also provides a simplified CLI for persistent certificate management inside the containerized environment.
Upload SSL Certificates
Section titled “Upload SSL Certificates”Do not manually copy certificates into the Linux file system, as the Nginx process runs inside an isolated container. Use the native SONiC CLI to import them into the persistent vault.
Assuming you have uploaded your commercial certificate (asterfusion.crt) and private key (asterfusion.key) to /home/admin/:
The system will automatically mount these to /etc/sonic/nginx/cert/ inside the containersonic(config)# nginx update cert /home/admin/asterfusion.crtsonic(config)# nginx update cert /home/admin/asterfusion.key
## Configure H****TTPS Proxy
Create a new configuration file (e.g., `https_proxy.conf`) using the standardized certificate paths.
```nginxcontent of /home/admin/https_proxy.confserver {    listen 8443 ssl default_server;    server_name AsterNOS;
    # Core: Point to the system-managed certificate vault    ssl_certificate      /etc/sonic/nginx/cert/asterfusion.crt;    ssl_certificate_key  /etc/sonic/nginx/cert/asterfusion.key;
    location ^~/ {        proxy_pass http://172.16.10.100:80;
        # Pass essential headers to the backend        proxy_set_header Host $host;        proxy_set_header X-Real-IP $remote_addr;        proxy_set_header X-Forwarded-For $proxy_add_x_forwarded_for;        proxy_set_header X-Forwarded-Proto $scheme; # Tells backend the original request was HTTPS    }}
Deploy ****Configuration
Section titled “Deploy ****Configuration”Apply the HTTPS proxy configuration and reload the service.
BlockQuotesonic(config)# nginx update server /home/admin/https_proxy.confsonic(config)# nginx reload
## Verif****y the Service
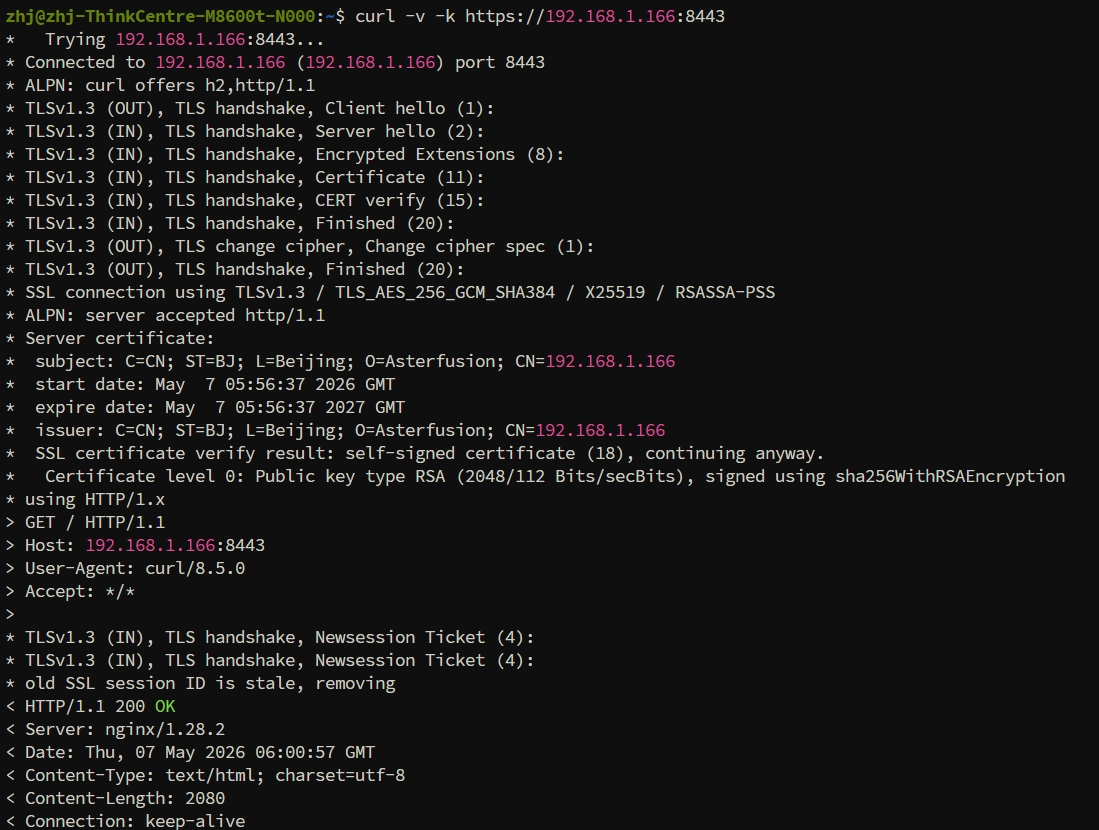
1. **Client Test:** Run`curl -v -k https://192.168.1.166:8443`2. **Expected Result:** A successful TLS handshake (`SSL connection using TLSv1.3`) followed by an `HTTP/1.1 200 OK` response with the backend content. The backend server logs will show a standard HTTP connection.
***
## Scenario 4: Upstream Load Balancing (with Advanced Strategies)
In a real-world production environment, critical applications are rarely hosted on a single server. To ensure high availability (HA) and distribute high-concurrency workloads, organizations deploy multiple identical backend servers.
AsterNOS natively supports Nginx's `upstream` module, allowing the gateway to act as an intelligent Layer 7 load balancer. It distributes incoming traffic across a pool of real backend nodes using various scheduling algorithms.
## C****onfigure Upstream Pool
In this scenario, assume you have three backend business servers located at `172.16.10.101`, `172.16.10.102`, and `172.16.10.103`.
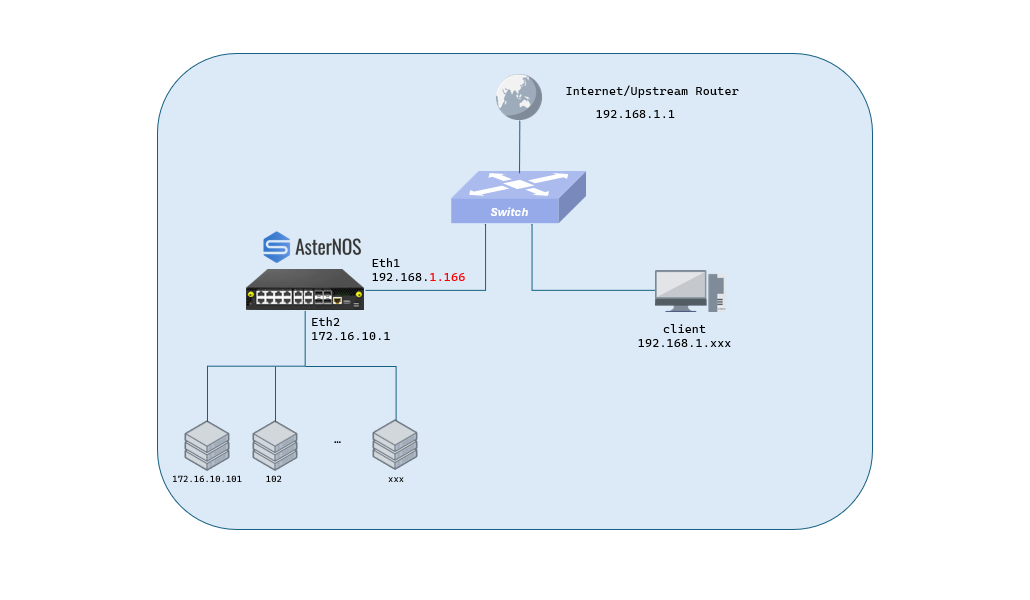
Create a configuration file (e.g., `load_balancer.conf`). The default distribution method is **Round Robin**, which distributes requests sequentially and evenly.
```nginx## content of /home/admin/load_balancer.conf
## 1. Define the pool of real backend serversupstream enterprise_backend_pool { server 172.16.10.101:80; server 172.16.10.102:80; server 172.16.10.103:80;}
## 2. Define the gateway's proxy behaviorserver { listen 8080 default_server; server_name AsterNOS;
location ^~/ { proxy_pass http://enterprise_backend_pool; proxy_set_header Host $host; proxy_set_header X-Real-IP $remote_addr; proxy_set_header X-Forwarded-For $proxy_add_x_forwarded_for; }}Deploy Configuration
Section titled “Deploy Configuration”Apply the configuration. Always use absolute paths to avoid directory context errors:
sonic# configure terminal
Apply the new Load Balancer configuration
Section titled “Apply the new Load Balancer configuration”sonic(config)# nginx update server /home/admin/load_balancer.conf sonic(config)# nginx reload
Verify the Service
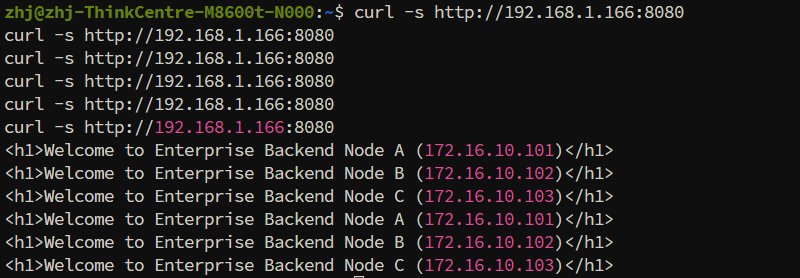
Section titled “Verify the Service”Run curl -s http://192.168.1.166:8080 multiple times. You will see responses alternately and evenly coming from Node 101, 102, and 103.
Advanced: Weighted Round Robin
Section titled “Advanced: Weighted Round Robin”When backend servers have different hardware specifications, you can assign weights to distribute traffic proportionally.
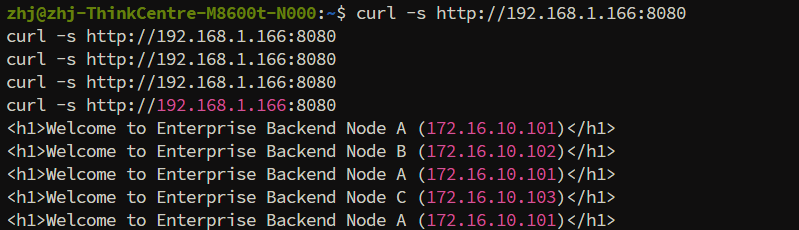
To make the first node process 3 times more traffic than the others, modify the upstream block in your file:
upstream enterprise_backend_pool { server 172.16.10.101:80 weight=3; # Receives 60% of traffic server 172.16.10.102:80 weight=1; # Receives 20% of traffic server 172.16.10.103:80 weight=1; # Receives 20% of traffic}Reload Nginx, and execution results will show a 3:1:1 request distribution ratio.
Advanced: IP Hash
Section titled “Advanced: IP Hash”For stateful applications (e.g., shopping carts, user logins), ensuring a specific client always reaches the same backend server is critical.
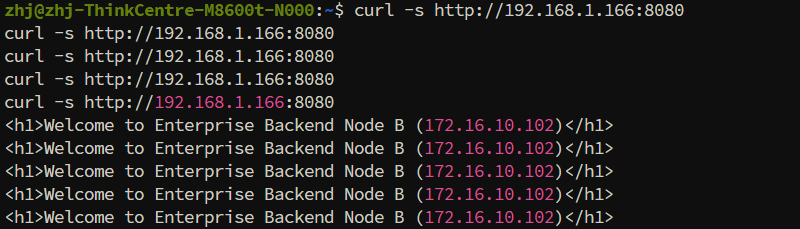
Add the ip_hash directive to bind the client’s IP to a specific node:
upstream enterprise_backend_pool { ip_hash; # Enable session persistence server 172.16.10.101:80; server 172.16.10.102:80; server 172.16.10.103:80;}Reload Nginx, and multiple requests from the same client IP will consistently be routed to the exact same backend server.
Conclusion
Section titled “Conclusion”This guide has successfully demonstrated the comprehensive Layer 7 application delivery capabilities of AsterNOS-VPP. By walking through real-world scenarios—from basic static file hosting to complex, high-availability upstream load balancing and secure SSL termination—we have verified the gateway’s readiness for enterprise deployments.